


A Christmas Crème Brûlée
Channeling my inner Zeke from High School Musical to make the (almost) perfect Christmas Eve dessert.

I decided to try something a bit new for our Christmas Eve dinner this year, and of course, by new I mean really hard because I attempted one of the most difficult desserts there is to make—crème brûlée. There were only four of us at dinner this year, so I felt it a safe enough space to channel my inner Zeke (if you know, you know; if you don’t, you’re uncultured) and attempt this creamy, delicious, caramelized dessert. (Spoiler alert: it doesn’t come out too shabby.)
Because I’m no chef myself (although yes, I am the baking queen), I followed a few different recipes for this dessert-making challenge. I made two chocolate crème brûlées and two regular/vanilla, using a combination of this New York Times recipe, this Natasha’s Kitchen recipe, and this Martha Stewart recipe. Baking lesson number one: always consult multiple sources.
Now, let me just say that I never listen to the recipes when they say to gather all the ingredients before you begin. I’m personally a huge fan of ping-ponging around the kitchen while I’m mixing things together to grab an egg from the fridge or the chocolate chips from the pantry, racing to the cabinet for sugar before the cream on the stove boils over. What’s baking without some higher stakes?
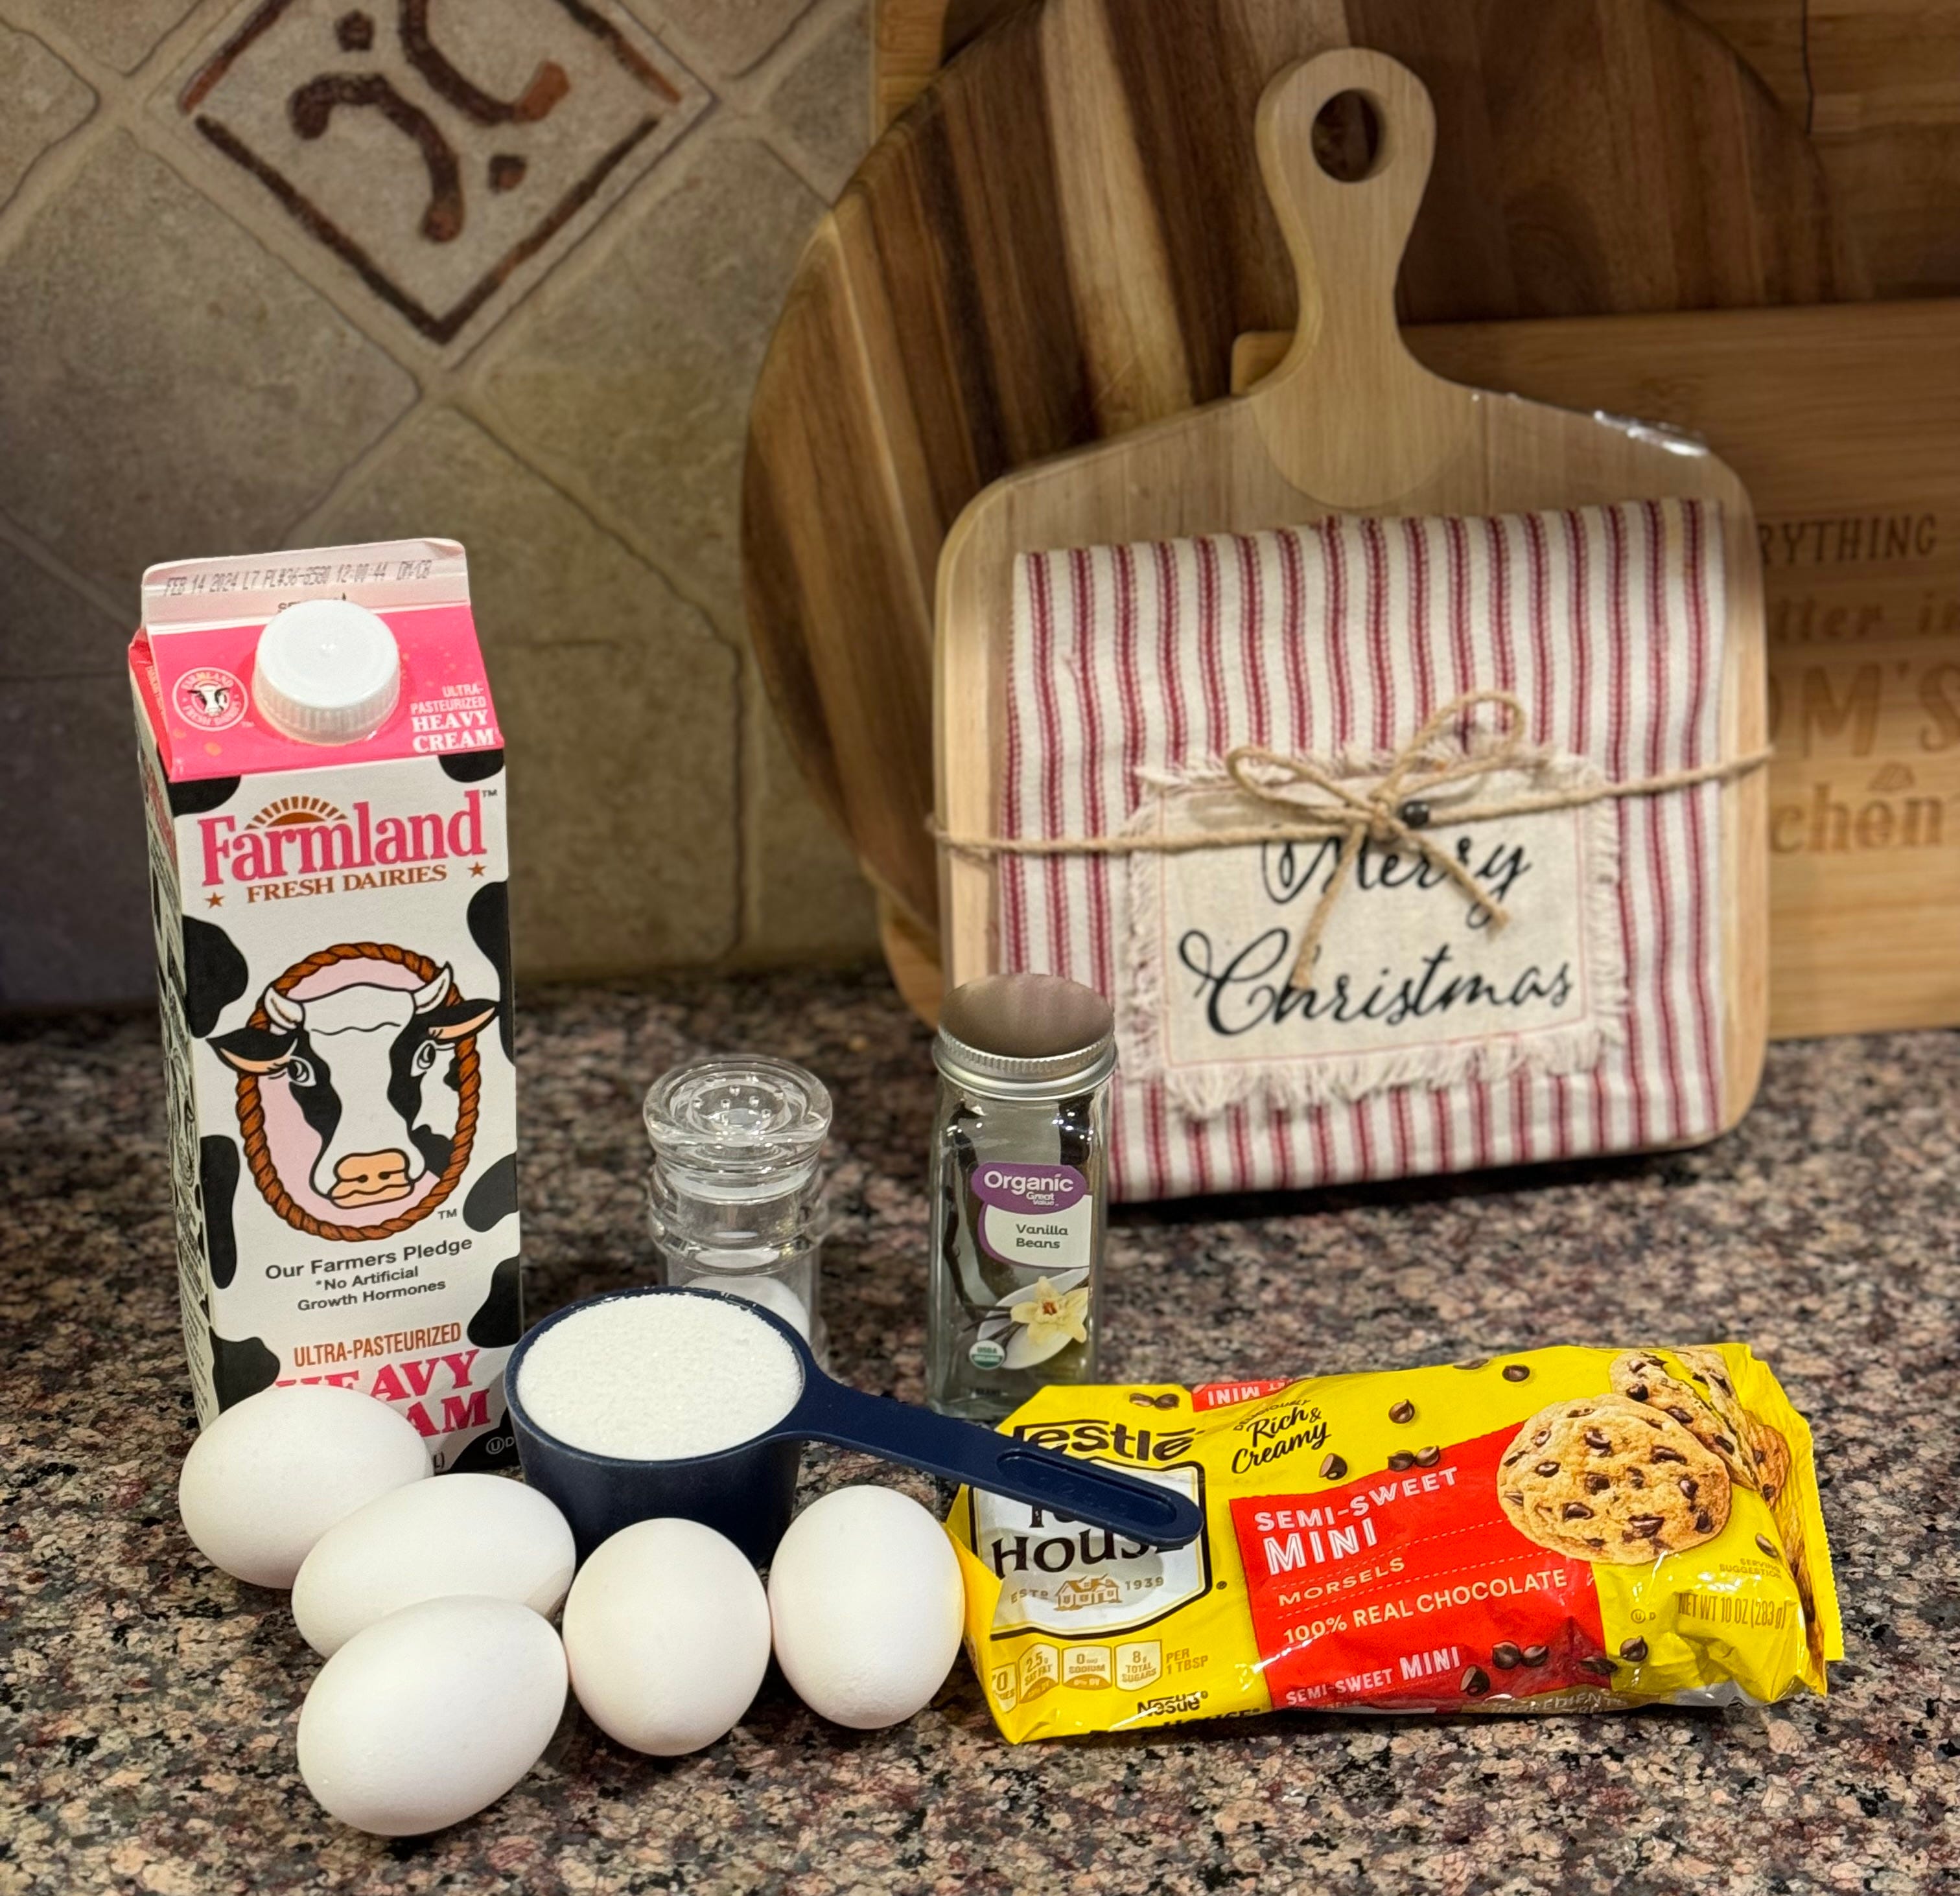
Alas, in making crème brûlée, there are already such high stakes (plus, I wanted to take this really food-bloggy picture of my ingredients for you all), so the first step is to gather your ingredients. I used 5 egg yolks (just the yolks! Save the whites for tomorrow’s breakfast, or don’t, whatever you want), a half cup of sugar (plus a little more for later), a pinch of sea salt, 2 cups of heavy cream (not heavy whipping cream people! There’s a difference! I don’t know what it is, but I’m told there is one), 2 vanilla beans, and some semi-sweet chocolate chips (measure chocolate with your heart, always).
This dessert is really simple ingredients-wise, and honestly pretty simple to assemble. The hard part comes last. We’ll get there soon.
The next step is to pour your heavy cream into a saucepan of your choosing, sprinkle in your salt, toss in your vanilla beans, and let the whole thing SIMMER *Taylor’s voice*. If you’re using whole vanilla beans, slice them down the middle so they can really permeate the milk with that vanilla flavor. If you can’t find the vanilla beans (and trust me, these things were difficult to find), just use vanilla extract—although how much, I can’t tell you, so do your own research, kids!
The recipes gave mixed information about how long to let this heavy cream sit on the heat, so I say just let it simmer, maybe a teeny-tiny boil, and then take it off the heat. Let it sit for a few minutes on a back burner, and then if you used the vanilla beans, be sure to toss them in the trash at this point. They’ve done their job.
While that mixture is getting hot, you can start on your egg and sugar mixture (although make sure to keep stirring the cream at the same time. Baking is all about multitasking).


Preferably over a sink or a bowl, crack the eggs into your hands (if you’re cool like me, you’ll do a one-handed egg crack). Let the egg whites shimmy between your fingers until only the yolk is in your hand, and put those five egg yolks into a mixing bowl. Add the sugar to this mixture, and whisk until it’s smooth and a lightish yellow color.
I had to read the recipes a few times to understand this next part—for literally no reason, because it’s pretty simple—but now’s when we’ll introduce our cream mixture to our egg mixture. First, pour a small amount of the cream mixture into the egg mixture and whisk that together. Do this slowly, because I’ve heard on some cooking shows that adding heat to an egg mixture too fast could scramble your eggs—I don’t know how true that is here, but how gross would scrambled eggs be in the middle of a crème brûlée? Better safe than sorry.
Once the introductions are out of the way, it’s time to marry our mixtures together. Take the bowl with the egg (+ a little cream) mixture and pour it into the saucepan where the rest of the heavy cream is. Whisk thoroughly.
If you’re making a chocolate crème brûlée, this is when you’d get your chocolate of choice melted. Because I didn’t want to dirty another pot (my least favorite part of baking is the cleanup, the dishes), I put some chocolate chips into a microwave-safe bowl, poured a splash of heavy cream over it (because this feels like something fancy bakers do to melt chocolate. Someone ask Gordon if he’s proud), and popped it into the microwave for about 30 seconds.
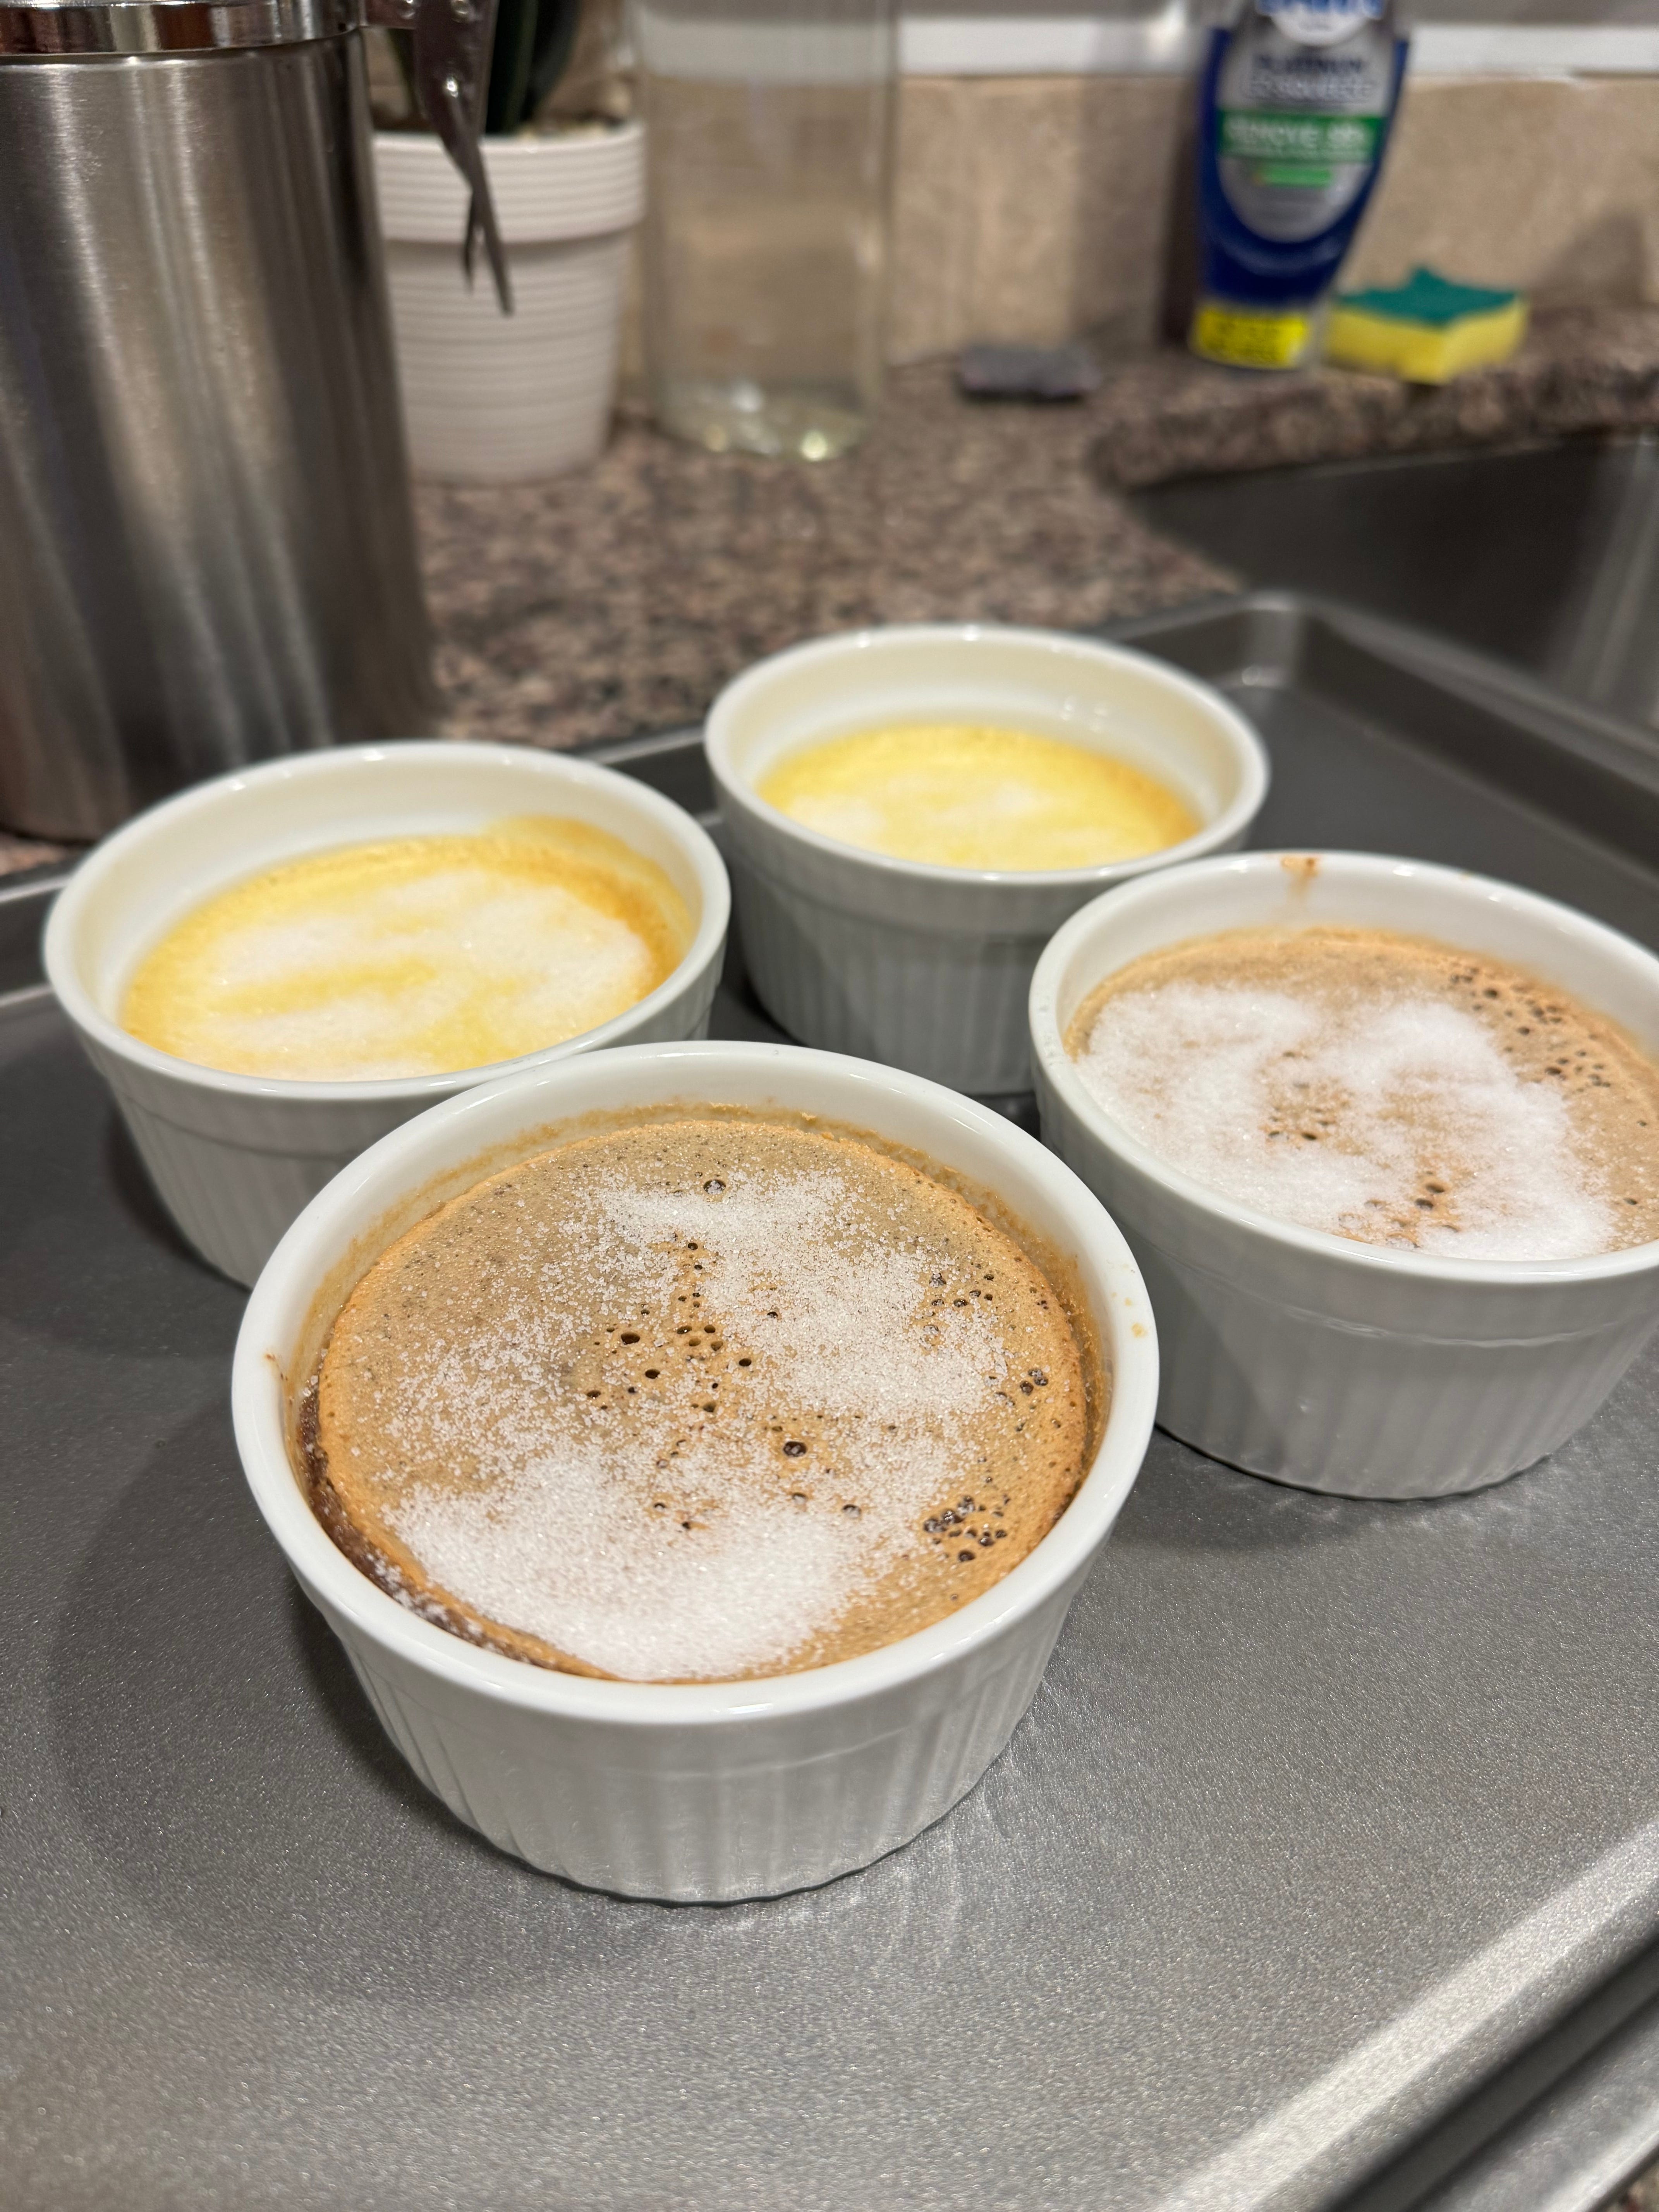
I poured the plain vanilla mixture into two ramekins for my vanilla crème brûlées, leaving about half of the mixture behind for the chocolate ones (this recipe makes 4 crème brûlées; I probably should’ve said that sooner). Then I poured the melted chocolate into the leftover mixture, and boom, chocolate crème brûlée mix.


Once all the ramekins were filled, it was time to bake! I popped these in a water bath, and after some major boiling water spillage all over my kitchen floor, they went in a preheated 350-degree oven for about 40 minutes.
The waiting is the worst part of any kind of cooking, I think, and this was no different. In fact, this was ten times worse, because I was anxious to know if I was going to screw these crème brûlées up. Here, I definitely felt like Zeke in the “Stick to the Status Quo” scene.

And everything was going perfectly, until it was time for the last and final step. Sigh.
I took the crème brûlées out of the oven around the 40-minute mark, when they were still slightly jiggly in the center, although I will note that the chocolate ones baked a bit faster than the vanilla ones. From the oven, the ramekins went straight into the freezer to set.
Really, they should’ve gone into the fridge, not the freezer. But of course, I broke the first rule of baking, which is to read the recipes in full before making anything. Apparently, these are supposed to set in the fridge for a couple hours, or even overnight. But I made them the night I wanted to eat them, and since I’m an impatient girl, I put them in the freezer to set in double time.
I let them set for about 15 minutes, which wasn’t long enough, but like I said, I’m an impatient girl. You should let them sit until they’re fully cooled, if you’re more patient than me.
Once set, it’s time to caramelize some sugar! Like all the sweetest things, measure this sugar topping with your heart.
I put a spoon of sugar on top of each one, and because I don’t have a torch (but it is already in my Amazon cart), I put these in the oven on the broil setting. Here’s where things got tricky: the broiler on my oven was at 550 degrees and it was STRONG. I sat right in front of the oven watching the tops of these crème brûlées to make sure they didn’t burn, and I swear, I looked away for just thirty seconds, and boom, the tops were burned.
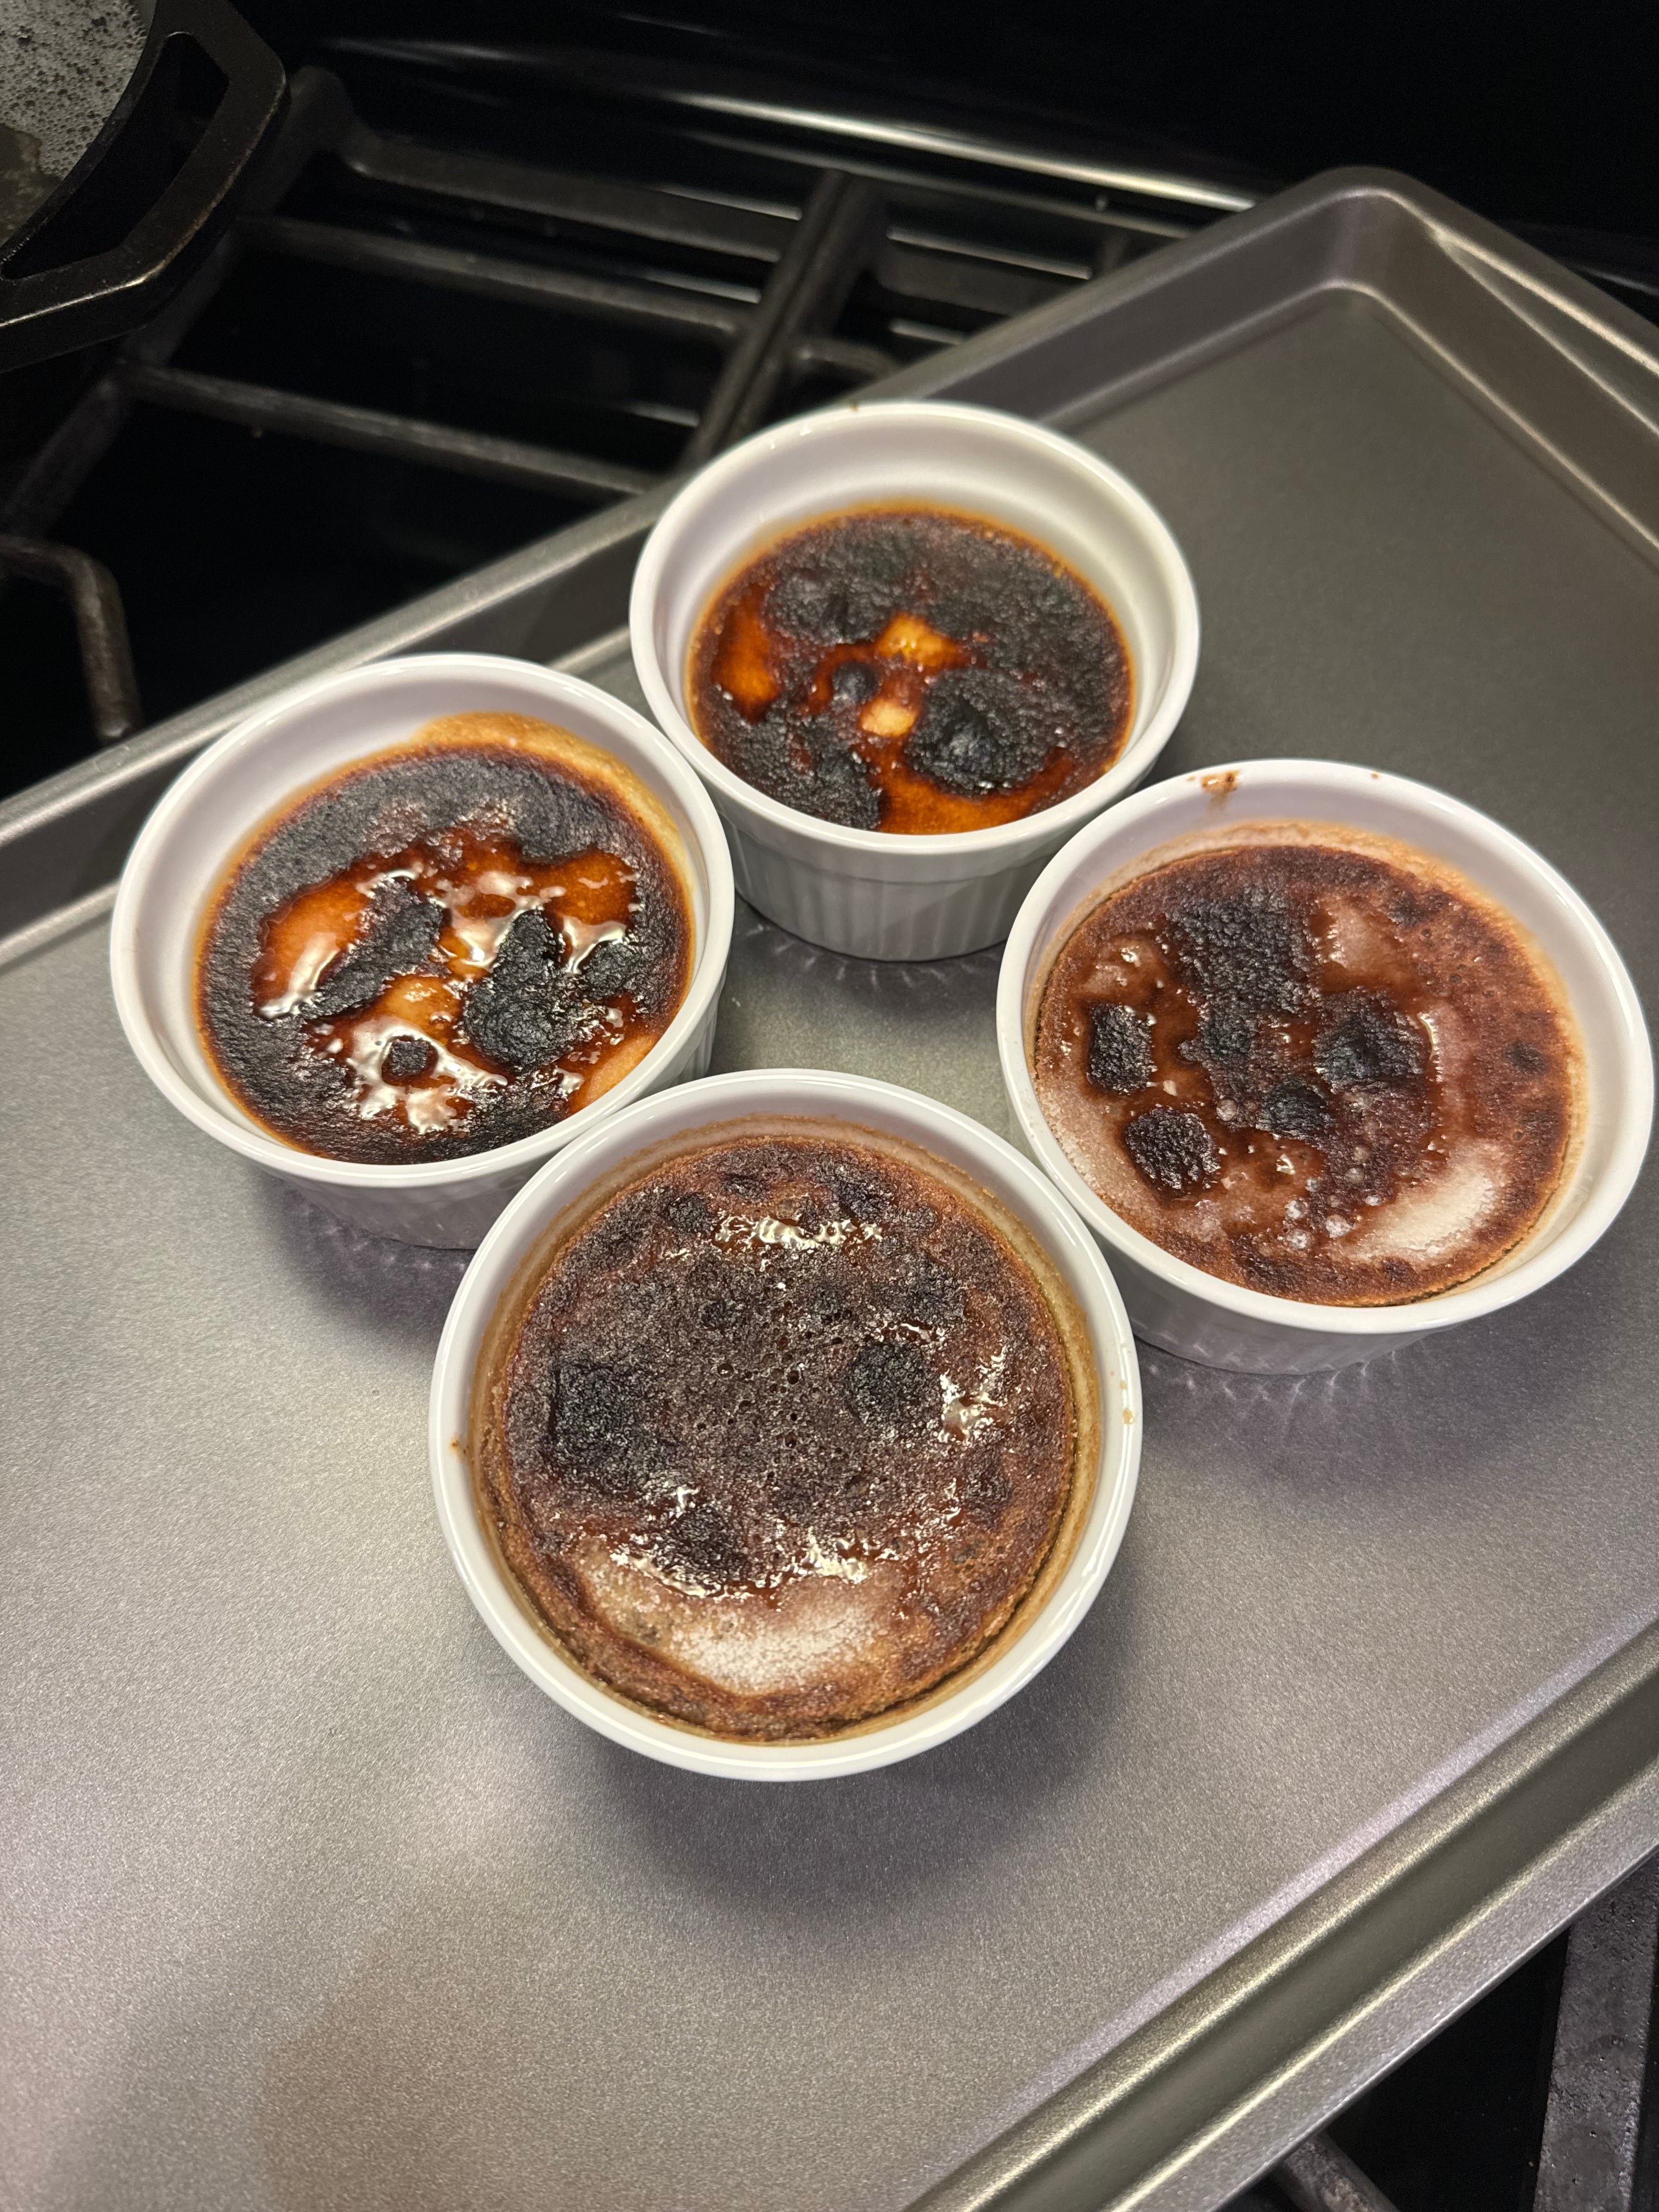
I didn’t even broil them for more than 5 minutes, so be very careful with this part. I would recommend using a torch for more control (I’ll report back on this when I try this recipe again with the torch).
But over-caramelizing the tops didn’t ruin the dessert. These were still pretty tasty, if I do say so myself, and my dining dates thought so too. My dad gave these a 3.5/5, my mom a 4/5, and my grandma a 7/5, so that’s an average of 4.83/5, which is basically a 5, so that’s pretty much perfect, am I right?
The crème brûlées were creamy, rich, and just the perfect amount of sweet. It was a comfort dessert, for sure (my mom said this, so it’s mom-approved). The texture wasn’t perfect, because they could’ve set for longer, but they were still like a nice pudding, and the crunchiness of the sugar topping was enough to make me feel like I probably got a cavity—in the best way.
The best judge of a crème brûlée, though, is—does the top crack when you knock your spoon into it? You be the judge, and put your sound up! (Plus, you can hear a live review from my very own father.)
Merry Christmas, my friends. May your desserts be as sweet as the company you keep.
Ratings
Presentation: 1.5/5 (Unfortunately! You eat with your eyes first, so do better than me.)
Taste: 4/5
Dining Date
I’m getting increasingly bad at remembering to take a photo of the people I’m eating with, so this is a picture of my parents and I right before bed—missing my grandma, who also enjoyed these desserts with us.
